YB/T 5201-1993致密耐火浇注料 常温抗折强度和耐压强度/Dense refractory castables Determination of cold modulus of rupture and cold crushing strength
致密耐火浇注料常温抗折强度和耐压强度试验方法
1主题内容和适用范围
本标准规定了致密耐火浇注料常温抗折强度、耐压强度的定义、测定的原理、设备、试样、试验步骤和数据处理方法。
本标准适用于测定致密耐火浇注料试样经养护、烘干或烧后的常温抗折强度和耐压强度。
2引用标准
GB 8170数字修约规则
YB/T 5202致密耐火浇注料 稠度测定和试样制备方法
YB/T 5203线变化率试验方法致密耐火浇注料,
3 定义
3.1常温抗折强度 在室温下,试样受到弯曲负荷的作用而断裂时的极限应力。以单位MPa(N/mm2)表示。
3.2 常温耐压强度在室温下,试样受到压力负荷的作用而破坏时的极限应力。以单位MPa(N/mm2)表示。
4原理
4.1抗折强度是在三点弯曲装置上,以规定的加荷速率对规定尺寸的试样施加张应力,直至试样断裂。
4.2耐压强度是在加压装置中,以规定的加荷速率对规定尺寸的试样施加压应力,直至试样破坏。
5设备
5.1抗折试验机 可采用各种类型的抗折试验机,或附有抗折夹具的压力试验机,并应满足下列要求:
a.测量的最大载荷不小于量程的10%;
b.能按规定速率对试样均匀加荷,并能记录或指示试样断裂时的荷载;
c.测力示值误差应小于±2%;
d.抗折夹具由相互平行的两个支撑辊和一个中心加荷辊组成,加荷辊位于支撑辊的中央,偏离中心不大于1 mm,支撑辊间的距离、辊的曲率半径及允许偏差见第 6.2.2条试样尺寸表。
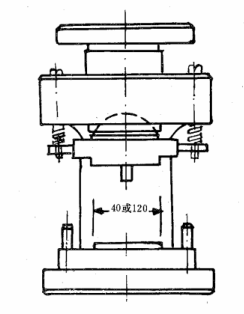
5.2:压力试验机 可采用如图1所示附有加压装置的机械式或液压式强度试验机,并应满足下列要求:
a.具有足够压碎试样的负荷。施加在试样上的最大载荷应不小于量程的10%;
b.能按规定速率对试样均匀加荷,并能记录或指示试样破坏时的荷载:
c.测力示值误差应小于±2%;
d.加压装置应放在试验机台板的中心。A型和B型试样,加压板的尺寸为(120±0.1)mmX(65±0.1)mm,厚度不小于10mm;c型试样,加压板的尺寸为(40±0.1)mmX(40±0.1)mm。压板应经过研磨,其中一块应装有球形座,可调节上下压板间的平行度。下压板应刻有标记,便于试样对准中心。

图1 加压装置示意图
5.3游标卡尺分度值0.05mm。
6试样
6.1试样数量
测定常温抗折强度每组试样为5块,不得少于3块;测定常温耐压强度每组试样不得少于6块。
6.2形状尺寸
6.2.1采用 B型试样,允许用A型和C型试样。
6.2.2常温抗折强度试样尺寸及允许偏差见下表。
|
试样尺寸表 mm |
|||||
|
试样尺寸 |
宽度和高度允许偏差 |
中部横切面两边平行度允许偏差 |
上下两面的平行度允许偏差 |
支承辊的距离(L) |
支承辊加压辊的曲率半径 |
|
A型 |
士2 |
±0.5 |
±0.3 |
180±1 |
15±0.5 |
|
B型 |
±2 |
±0.5 |
±0.3 |
180±1 |
15±0.5 |
|
C型 |
±1 |
±0.5 |
±0.2 |
100±1 |
5±0.2 |
也可以用测定线变化率、体积密度后的试样测定抗折强度。
6.2.3常温耐压强度可以用直接成型试样,也可用抗折强度试验后的两个半截试样。
6.3试样制备
6.3.1试样的成型、养护和烘干按YB/T 5202进行,
6.3.2试样焙烧按 YB/T 5203第6.3条规定进行,并随炉冷却到室温。
6.3.3试样经烘干和焙烧后,放入干燥器中。从冷却到试验的时间间隔不得超过三天。
7试验步骤
7.1抗折强度试验
7.1.1测量试样中部的宽度和高度,准确到0.1 mm。
7.1.2按试样尺寸表的规定,调整抗折夹具。
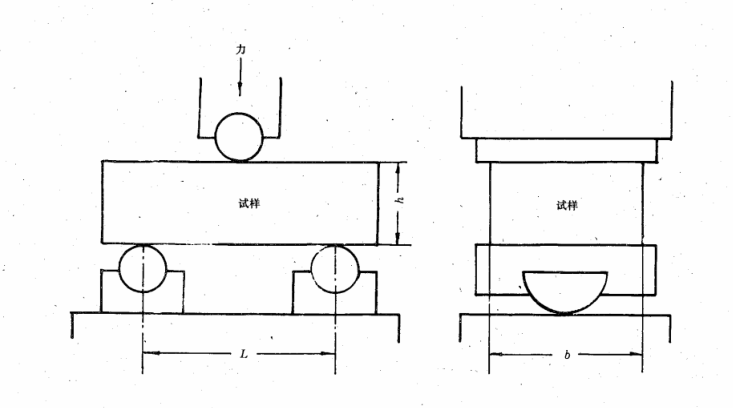
7.1.3 以试样成型侧面作承压面,将试样置于抗折夹具的支承辊上,调整加压辊置于支承辊中央并垂直于试样长轴(如图2所示)

图2 抗折强度试验示意图
7.1.4 以0.15±0.015 N/mm’s的速率对试样均匀加荷,直至断裂。不同尺寸试样可采用如下加荷速
率:
A型 240~300 N/s;
B型100~120 N/s;
C型:60~70 N/s。
记录试样断裂时的最大载荷。
7.2 耐压强度试验
7.2.1 测是试样上、下承压面的宽度,准确到 0.1 mm。
7.2.2 将试样按以上规定放置在加压装置中:
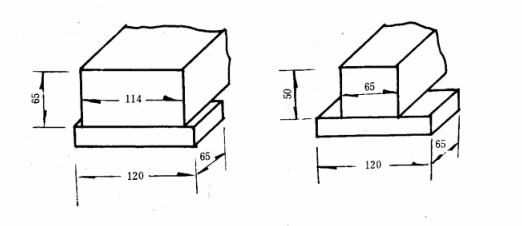
A 型和 B型试样按图3所示齐边放在下压板上;
C型试样以成型时的侧面作为承压面放在下压板上。

图3 试样在下压板上的放置
7.2.3以1±0.1 N/mm2s的速率对试样均匀加荷,直至破坏。不同尺寸试样可采用如下加荷速率:
A型6700~8 200 N/s;
B型3700~4 600 N/s;
C型1400~1 800 N/S.
记录试样破坏时的最大载荷。
8结果计算
8.1常温抗折强度按公式(1)计算:

式中:
Rr,-抗折强度,MPa( N/mm2)
F-试样断裂时的最大载荷,N
L-支撑辊间的距离,mm;
b-试样中部的宽度,mm;
h试样中部的高度,mm。
8.2 常温耐压强度按公式(2)计算:

式中:
Cs,-耐压强度,MPa( N/mm2);
a-加压板的宽度,mm;
b-试样的宽度,mm。
8.3 数据处理
8.3.1计算一组试样的平均值,并计算出相应的标准离差(S)和变异系数(V)。平均值、标准离差(S)和变异系数(V)分别按公式(3)、(4)、(5)计算:


式中:X1、X2,、…· Xi、Xn–试样的单值;
n-试样个数。
以组平均值X作为试验结果。
当变异系数V>15%时,需重新进行试验,
注:1)指参与试验的全部试样的个数。
8.3.2常温抗折强度和耐压强度的结果计算至小数点后一位,所取位数后的数字按GB 8170进行处理。
9试验报告
试验报告应包括以下内容:
a.委托单位;
b.试样材质、名称及编号;
c.试样预处理条件(养护、烘干、焙烧温度及保温时间等);
d.试样的形状尺寸;
e.抗折强度的单个值及平均值;
f.耐压强度的单个值及平均值:
g.试验单位;
h.试验人员;
i.试验日期。
Determination of cold modulus of rupture and cold crushing strength
1 Subject content and scope of application
This standard specifies the definition of folding strength and compressive strength of dense refractory castables at room temperature, the principle of measurement, equipment, samples, test procedures and data processing methods.
This standard is applicable to the determination of the flexural strength and compressive strength of dense refractory castable samples after curing, drying or firing at room temperature.
2Reference standard
GB 8170 digital modification rules
YB/T 5202 dense refractory castable consistency determination and sample preparation method
Test method for YB/T 5203 line change rate Dense refractory castables,
3 Definition
3.1 Flexural strength At room temperature The ultimate stress at which the specimen is broken due to bending load at room temperature. The unit is MPa(N/mm2).
3.2 Compressive strength at room temperature The ultimate stress when the sample is damaged by the action of pressure load at room temperature. The unit is MPa(N/mm2).
4 Principles
4.1 Flexural strength is the tensile stress applied to a specimen of a specified size at a specified loading rate on a three-point bending device until the specimen breaks.
4.2 Compressive strength is the compression stress applied to the specimen of the specified size at the specified loading rate in the pressurizing device until the specimen is damaged.
5 Devices
5.1 Folding testing machine Various types of folding testing machines can be used, or pressure testing machines with folding fixtures, and should meet the following requirements:
a.The maximum load measured is not less than 10% of the range;
b.Can evenly load the sample at the specified rate, and can record or indicate the load when the sample breaks;
c.The error of force measurement should be less than ±2%;
d.The anti-bending fixture is composed of two parallel support rolls and a central loading roll, the loading roll is located in the center of the support roll, the deviation from the center is not more than 1 mm, the distance between the support rolls, the radius of curvature of the roll and the allowable deviation are shown in the sample size table in Article 6.2.2.
5.2: The mechanical or hydraulic strength testing machine with a pressure device as shown in Figure 1 can be used, and shall meet the following requirements:
a.Sufficient load to crush the sample. The maximum load applied to the sample shall not be less than 10% of the measuring range;
b.The sample can be uniformly loaded at the specified rate, and the load when the sample is damaged can be recorded or indicated:
c.The error of force measurement should be less than ±2%;
d.The pressure device should be placed in the center of the testing machine table. For type A and type B samples, the size of the pressing plate is (120±0.1)mmX(65±0.1)mm, and the thickness is not less than 10mm; For type c specimens, the size of the pressing plate is (40±0.1)mmX(40±0.1)mm. The platens shall be ground and one of them shall be equipped with a spherical seat to adjust the parallelism between the upper and lower platens. The lower pressure plate should be marked to facilitate sample centering.

FIG. 1 Schematic diagram of the pressurizing device
5.3 Vernier caliper index value 0.05mm.
6 samples
6.1 Sample Quantity
The flexural strength at normal temperature was determined with 5 samples in each group and no less than 3 samples; To measure the compressive strength at normal temperature, each group of samples shall not be less than 6 pieces.
6.2 Shape and Size
6.2.1 Type B samples are used, type A and type C samples are allowed.
6.2.2 The sample size and allowable deviation of flexural strength at room temperature are shown in the following table.
|
Sample size table mm |
|||||
|
Sample size |
Permissible deviation of width and height |
Allowable deviation of parallelism between the two sides of the middle transverse plane |
The parallelism of the upper and lower sides allows deviation |
Distance of back-up roll(L) |
Back-up roll The radius of curvature of the compression roll |
|
Type A230x114X65 |
士2 |
±0.5 |
±0.3 |
180±1 |
15±0.5 |
|
Type B230x65X54 |
±2 |
±0.5 |
±0.3 |
180±1 |
15±0.5 |
|
Type C160x40X40 |
±1 |
±0.5 |
±0.2 |
100±1 |
5±0.2 |
The bending strength can also be determined by the sample after measuring the line change rate and volume density.
6.2.3 The compressive strength at room temperature can be directly formed samples, or two half samples after folding strength test.
6.3 Sample Preparation
6.3.1 Molding, curing and drying of the sample shall be carried out according to YB/T 5202.
6.3.2 The sample shall be roasted according to Article 6.3 of YB/T 5203 and cooled to room temperature with the furnace.
6.3.3 After drying and roasting, the sample is placed in the dryer. The interval between cooling and testing shall not exceed three days.
7 Test Procedure
7.1 Flexural strength test
7.1.1 Measure the width and height of the middle of the specimen to the accuracy of 0.1mm.
7.1.2 Adjust the bending fixture according to the sample size table.
7.1.3 Take the forming side of the sample as the bearing surface, place the sample on the back-up roll of the bending fixture, and adjust the compression roll to the center of the back-up roll and perpendicular to the long axis of the sample (as shown in Figure 2).

FIG. 2 Schematic diagram of flexural strength test
7.1.4 The sample is uniformly charged at a rate of 0.15± 0.015N /mm’s until it breaks. The following loading rates can be used for samples of different sizes
Rate:
Type A 240~300 N/s;
Type B 100~120 N/s;
Type C :60~70 N/s.
Record the maximum load when the specimen breaks.
7.2 Compressive strength test
7.2.1 Measurement is the width of the specimen’s upper and lower pressure surfaces, accurate to 0.1mm.
7.2.2 Place the sample in the pressurizing device according to the above provisions:
The samples of type A and type B are placed on the lower press plate with flush edges as shown in Figure 3;
The C-type sample is placed on the lower pressure plate with the side of the molding as the pressure surface.

FIG. 3. Specimen placement on the lower plate
7.2.3 The sample is uniformly charged at the rate of 1± 0.1N /mm2s until it is destroyed. The following loading rates can be used for samples of different sizes:
A 6700~8 200 N/s;
B 3700~4 600 N/s;
C 1400 to 1 800 N/S.
Record the maximum load at the time of specimen failure.
8 Result Calculation
8.1 Flexural strength at room temperature is calculated according to formula (1) :

In the formula :
Rr,- flexural strength,MPa(N/mm2)
F- Maximum load on the specimen at fracture,N
L- Distance between support rollers, mm;
b- Width of the middle of the sample,mm;
h The height of the middle of the sample,mm.
8.2 Compressive strength at room temperature is calculated according to formula (2) :

In the formula:
Cs,- compressive strength,MPa(N/mm2);
a- Width of the pressure plate,mm;
b- Width of sample,mm.
8.3 Data Processing
8.3.1 Calculate the mean value of a set of samples and calculate the corresponding standard deviation (S) and coefficient of variation (V). The mean value, standard deviation (S) and coefficient of variation (V) are calculated according to formulas (3), (4) and (5) respectively:


In the formula :X1, X2,… · Xi, Xn— single value of the sample;
n- Number of samples.
The average value of the group X was taken as the test result.
When the coefficient of variation V>15%, the test should be re-conducted.
Note :1) refers to the number of all samples participating in the test.
8.3.2 The results of flexural strength and compressive strength at room temperature are calculated to one decimal place, and the number after the digit taken is treated as GB 8170.
9 Test Report
a.The test report shall include the following:
b.The entrusted unit;
c.Sample material, name and number;
d.Sample pretreatment conditions (curing, drying, roasting temperature and holding time, etc.);
e.The shape and size of the sample;
f.Individual value and average value of flexural strength;
g.Individual value and average value of compressive strength:test unit;
h.Test personnel;
i.Trial date.


