YB/T 118-2020 耐火材料 气孔孔径分布试验方法/Refractory products-Determination of pore size distribution
耐火材料气孔孔径分布试验方法
1 范围
本标准规定了耐火材料气孔孔径分布的试验原理、试验仪器和设备、试验步骤、试验结果和计算、试验报告。
本标准适用于测定耐火材料的开口气孔的孔径分布、平均孔径、小于1μm 气孔的孔容积占总孔容积百分率和大于1 μm 气孔的孔容积占耐火材料体积百分率。测试孔径范围 0.006 μm~360 μm。
2 规范性引用文件
下列文件对于本文件的应用是必不可少的。凡是注日期的引用文件,仅注日期的版本适用于本文件。凡是不注日期的引用文件,其最新版本(包括所有的修改单)适用于本文件。
GB/T 2997 致密定形耐火制品体积密度、显气孔率和真气孔率试验方法
GB/T 8170 数值修约规则与极限数值的表示和判定
3 定义
下列术语和定义适用于本文件,
3.1
平均孔径 average pore size
在所测孔径范围内,直径对孔容积的积分除以总的孔容积。
3.2
小于1 μm 孔容积占总孔容积百分率 percentage of pore volume less than1 micron in the volume oftotal pore
耐火材料中小于 1 μm 的孔容积占总孔容积百分数,
3.3
大于1μm 孔容积占耐火材料体积百分率 percentage of pore volume over 1 micron in the volume ofrefractory
耐火材料中大于1 μm 的孔容积占整体耐火材料体积的百分数
3.4
孔径分布 pore size distribution
不同孔径下的孔容积分布频率。
4 试验原理
汞在给定的压力下会浸入多孔物质的开口气孔,当均衡地增加压力时能使汞浸入样品的细孔,被浸入细孔的大小和所加的压力成反比。
5 试验仪器和设备
5.1 压汞仪
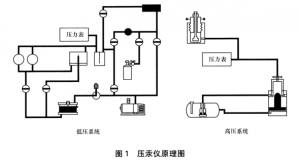
压汞仪原理图,如图1。

注:
技术要求:最大压力 207 MPa;
最小压力 3. 45 kPa;
抽真空后低压仓残余压力<50 μmHg。
5.2 瓶装氨气(或压缩空气):要求清洁、干净、无油;压力>0.3 MPa。
5.3天平:顶部开门,量程不小于 200 g;精度为 0.1 mg。
5.4烘箱:最高温度不小于 200 ℃,控制精度士5 ℃。
5.5汞:不少于 5 kg,纯度 99.9%。
5.6圆孔标准筛:筛孔直径 4 mm 和 8 mm。
5.7通风橱:环境温度 14 ℃~25 ℃,相对湿度 30%~70%
6安全防护措施
6.1环境安全:本试验需在通风橱内进行,确保通风良好
6.2 防护措施:试验过程中操作入员须佩戴防护口罩和手套,避免接触汞蒸气和汞液。
6.3处置办法:实验室应备存锡箔、铜丝(经硝酸腐蚀过)、三氯化铁饱和溶液和毛刷若干。如遇汞液酒落,可用锡箔收集(当汞滴十分细小或散落在缝隙中时,可取适量硫磺粉覆盖或用铜丝清理收集),收集到的汞液应装在封口瓶中。清扫收集完成后,在汞液污染过的区域涂刷三氯化铁饱和溶液,放置1h后清扫收集。
7 试验步骤
7.1 试样制备
从待测样品上任取 50 g~100g试样,对其破碎后,用标准筛筛取4 mm~8 mm 试样 20g左右,置于烘箱中,在 110 ℃zheng’fu5 ℃温度下,恒温干燥2h,待其自然冷却至常温后,置于干燥器中备用。如待测样品直径小于4 mm,则直接称取 20 g左右,按上述要求烘干备用。
7.2 膨胀计体积值的标定
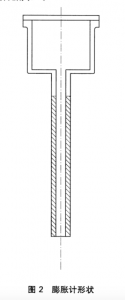
压汞仪膨胀计的形状如图2所示。体积值的标定在 14 ℃~25 ℃的室温内,任选三个温度点,分别进行一次膨胀计注汞操作,按注入的汞质量,算出该温度下的体积值,取三次测量结果的算术平均值,作为该膨胀计的标定值。膨胀计的选择见附录 A。

7.3 操作步骤
7.3.1称取干燥后的空膨胀计质量,然后将样品装满膨胀计,称取装满后的膨胀计质量,用装满试样的膨胀计质量减去空膨胀计质量,即为样品质量。
7.3.2将装好试样的膨胀计放入压汞仪的低压仓内固定好。
7.3.3开真空泵抽真空。
7.3.4通入 N气(或压缩空气)。
7.3.5抽真空后,当低压仓残余压力小于 50 umHg时,给膨胀计内注汞。
7.3.6取出低压阶段测试完毕的膨胀计,置于高压仓内,在高压运行中,记录不同压力(P)对应的汞压入量。
7.4 试验结果和计算
7.4.1 孔径与压力的关系公式(1):
![]()
式中:
D-孔径,单位为微米(μm);压力,
P-单位为兆帕(MPa);
r-汞的表面张力,485 dyn/cm;
θ-汞的接触角,单位为度(°)。
7.4.2 平均孔径按公式(2)计算:

式中:
平均孔径,单位为微米(μm);
D –某一压力所对应的孔直径,单位为微米(μm);
V总–开口气孔的总容积,单位为立方厘米(cm’);
dv –孔容积微分值,单位为立方厘米(cm3)。
7.4.3 小于1 μm 气孔容积占气孔总容积百分率计算公式为:
![]()
式中:
R’–小于1 μm 气孔容积占气孔总容积百分率;
V总-汞压人总量,单位为立方厘米(cm3);
V1-大于 1 μm 孔径的汞压人量,单位为立方厘米(cm3)。
7.4.4 大于 1 μm 孔容积占耐火材料体积百分率计算公式为:
![]()
式中:
Rn–大于1 μm 孔容积占耐火材料体积百分数;
n–耐火材料显气孔率。
7.4.5试验结果
本试验结果保留小数点后 2位有效数字,数值修约按 GB/T 8170 的规定执行。
8试验报告
试验报告包括下列内容:
a)委托单位;
b) 试样名称;
c)试样编号;。
d)试验日期;
e)试验人员;。
f)试验单位;
g)试验结果。
Refractory products-Determination of pore size distribution
1 Range
This standard specifies the test principle, test instruments and equipment, test procedures, test results and calculations, and test reports of the porosity distribution of refractory materials.
This standard is applicable to determine the pore size distribution, the average pore size, the percentage of pore volume less than 1μm in the total pore volume and the percentage of pore volume greater than 1μm in the volume of the refractory. The test aperture ranges from 0.006μm to 360μm.
2 Normative reference documents
The following documents are essential for the application of this document. For dated references, the date-only version applies to this document. For undated references, the latest version (including all amendment orders) applies to this document.
Test method for bulk density, apparent porosity and true porosity of GB/T 2997 compact shaped refractory products
GB/T 8170 numerical revision rules and limit value representation and judgment
3 Definition
The following terms and definitions apply to this document.
3.1
Average pore size
In the measured aperture range, the integral of the diameter to the hole volume is divided by the total hole volume.
3.2
Percentage of pore volume less than1 micron in the volume oftotal pore
The percentage of hole volume less than 1 μm in the total hole volume of refractories,
3.3
Percentage of pore volume over 1 micron in the volume ofrefractory
The percentage of pore volume greater than 1 μm in the volume of the overall refractory
3.4
Pore size distribution
Distribution frequency of pore volume under different pore sizes.
4 Test principles
Mercury at a given pressure will be immersed in the porous material of the opening pores, when the pressure is evenly increased, mercury can be immersed in the sample pores, the size of the immersed pores is inversely proportional to the pressure applied.
5 Test instruments and equipment
5.1 Mercury injection instrument
Schematic diagram of mercury injection instrument, as shown in Figure 1.

Note:
Technical requirements: maximum pressure 207 MPa;
Minimum pressure 3.45 kPa;
The residual pressure of the low pressure chamber after vacuuming is < 50μmHg.
5.2 Bottled ammonia (or compressed air): clean, clean and oil-free; Pressure > 0.3MPa.
5.3Balance: top door, measuring range is not less than 200g; The accuracy is 0.1mg.
5.4Oven: Maximum temperature is not less than 200 ℃, control accuracy is 5 ℃.
5.5 Mercury: not less than 5 kg, 99.9% purity.
5.6 Round hole standard screen: screen diameter 4 mm and 8 mm.
5.7 Fume hood: Ambient temperature 14 ℃~25 ℃, relative humidity 30%~70%
6 Security Measures
6.1 Environmental safety: This test should be carried out in a fume hood to ensure good ventilation
6.2 Protective measures: During the test, participants shall wear protective masks and gloves to avoid contact with mercury vapor and liquid.
6.3 Disposal method: Tin foil, copper wire (corroded by nitric acid), ferric chloride saturated solution and brush should be kept in the laboratory. In case of mercury liquor falling, it can be collected by tin foil (when mercury drops are very small or scattered in the gap, an appropriate amount of sulfur powder can be covered or cleaned with copper wire), and the collected mercury should be packed in a sealed bottle. After the cleaning and collection is completed, the area contaminated by mercury solution is coated with ferric chloride saturated solution, and it is placed for 1h before cleaning and collection.
7 Test Procedure
7.1 Sample Preparation
Take 50g ~100g sample from the sample to be tested, after it is broken, screen about 20g sample of 4 mm~8 mm with a standard screen, put it in the oven, and dry it at 110 ° C ±5 ° C for 2h under constant temperature, after it is cooled to normal temperature, put it in the dryer for use. If the diameter of the sample to be measured is less than 4 mm, directly weigh about 20 g, dry according to the above requirements for use.
7.2 Calibration of dilatometer volume value
The shape of the dilatometer is shown in Figure 2. At the room temperature of 14 ℃~25 ℃, three temperature points are selected to carry out a mercury injection operation of the dilatometer, and the volume value at this temperature is calculated according to the injected mercury mass, and the arithmetic average of the three measurement results is taken as the calibration value of the dilatometer. See Appendix A for selection of dilatometers.

7.3 Procedure
7.3.1 Weigh the empty dilatometer mass after drying, then fill the sample with the dilatometer, weigh the filled dilatometer mass, subtract the empty dilatometer mass from the filled sample, and the sample mass is the sample mass.
7.3.2 Put the dilatometer loaded with the sample into the low pressure chamber of the mercury injection instrument and fix it.
7.3.3 Start the vacuum pump to vacuum.
7.3.4 Pass N gas (or compressed air).
7.3.5 After vacuuming, when the residual pressure of the low pressure chamber is less than 50 umHg, inject mercury into the dilatometer.
7.3.6 Take out the dilatometer that has been tested in the low pressure stage, place it in the high pressure chamber, and record the mercury injection amount corresponding to different pressures (P) during the high pressure operation.
7.4 Test results and calculations
7.4.1 Relationship between aperture and pressure formula (1):
![]()
Formula:
D- aperture, unit: micron (μm); The pressure,
P- unit is megapascals (MPa);
Surface tension of R-mercury,485 dyn/cm;
θ- The contact Angle of mercury, in degrees (°).
7.4.2 The average aperture is calculated according to formula (2) :

Formula:
Average aperture, in micrometers (μm);
D — the diameter of the hole corresponding to a certain pressure, in micrometers (μm);
V Total – the total volume of the open porosity, in cubic centimeters (cm’);
dv – the differential value of the pore volume in cubic centimeters (cm3).
7.4.3 The percentage of stomatal volume less than 1 μm in total stomatal volume is calculated as follows:
![]()
Formula:
R’– percentage of stomatal volume less than 1 μm in total stomatal volume;
V Total – total mercury pressure, in cubic centimeters (cm3);
V1- Mercury pressure greater than 1 μm aperture, in cubic centimeters (cm3).
7.4.4 The percentage of pore volume greater than 1 μm to refractory volume is calculated as follows:
![]()
Formula:
Rn- more than 1 μm hole volume percentage of refractory volume;
n– apparent porosity of refractories.
7.4.5 Test results
The results of this test are reserved for 2 significant digits after the decimal point, and the numerical modification is carried out in accordance with the provisions of GB/T 8170.
8 Test report
The test report includes the following:
a) the entrusting unit;
b) sample name;
c) Sample number; .
d) Test date;
e) Test personnel; .
f) test unit;
g) Test results.


